

Wedge Star Block 10
Posted by Lois Plantt on
Wedge Star Sew Along-Block 10
Diamond Four Patch Wedge
This is the last block we will be looking at using this tool and is, by far, my favorite.
You will need theTechnique Sheet for Diamond Four Patch Wedge for this block. You can purchase it here.
Because the difficulty rating on this one is a 5, we have left it until the end to allow you to get very comfortable with the tool!!
The complexity of this block and the variety of layouts allow you to achieve very intricate patterns.
Quilts such as ‘Argyle’ , are what makes this block worth the challenge!
(click the pictured to purchase this pattern)

Once again I encourage you to read the pattern completely before you begin.
One major difference between this block and the previous ones, we have completed, is the size of the blocks. The original instructions guide you to create blocks from 3” to 24” square.
The instructions for the Diamond Four Patch Wedge allows you to make blocks 6” to 48” square.
Cutting
Refer to the cutting section to determine the size block you wish to make and cut accordingly. Note the larger the block you chose the more strips you will require.
The reason for cutting 2 strips for the middle diamond is, you are working with strip sets and there are 2 middle strips in each diamond four patch set.
Step 1
Make two strip sets using 1 middle diamond and 1 inner diamond strip for one strip set and 1 middle diamond and 1 outer diamond for the second.
Stagger the sets as shown in step 1 diagram. Be aware the diagram is showing the strip sets from the WRONGSIDE!

Lay the strips down with the wrong side up to determine which way to stitch together, this way you will avoid the need to use the seam ripper (as I did).
Press S.A. open.
Step 2
Following the instructions and working from the WRONG SIDE cut angled sections from 2 strips at a time.

The angled strips will be cut the same size as the ‘cut size of diamond strips’.
Example:- if you are making a 20” block you will have cut the strips
2 ¾”, you will then cut these angled sections 2 ¾” from the strip sets.

Step 3
Following step 3 lay out and mark each section.

Remember the pin method? If not you can watch the video
here.
I use this method to match the points.
Press the S.A. open.
Step 4
Mark the tool as per the instructions in ‘step 4’ then trim the outer points as per the chart on the technique sheet.
Example:-the ‘Outer Point Trim Line’ for the 20” block is 10”.
Step 5
Lay out your trimmed diamond four patch sets and small wedges.

I find this step extremely helpful to keep me on track.
Stitch the wedge to the right hand side of each point first and press S.A. to the diamond 4 patch.
Add the second wedge to the left hand side and press S.A. towards the wedge.
By adding the wedges in this order and pressing in the direction stated your next seams will lock and the whole block will go together more precisely and neatly.
Step 6
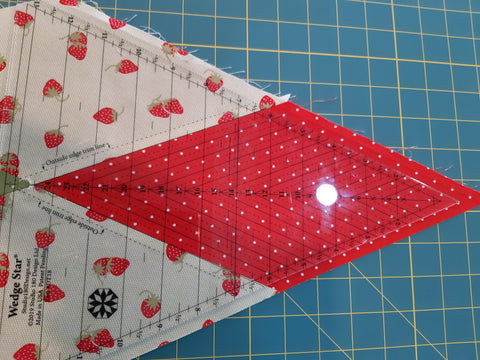
Trim according to directions. For blocks larger than 24” you will need to use a 24” ruler and reposition as in the directions or two rulers as in the picture shown.

Step 7
Assemble the block as in the previous blocks referring to steps 1.12 through 1.19 in the Wedge Star tool instructions.
This is my block!!

I decided to add some borders to my block!!

As you can see in the picture below (yes those are my feet and that is a 24 1/2" ruler laying on my block) mine is rather large!!
I chose to make the 48" block and with a 3 1\2" border my 'block' is now 54" x 54" and I am going to use it as a tablecloth!!

Have fun with whatever you choose to do and send us a picture!!!